Desire 2 Learn (D2L) -vs- Canvas
Desire 2 Learn- Modifying a Dropbox Assignment with Differentiated Conditions
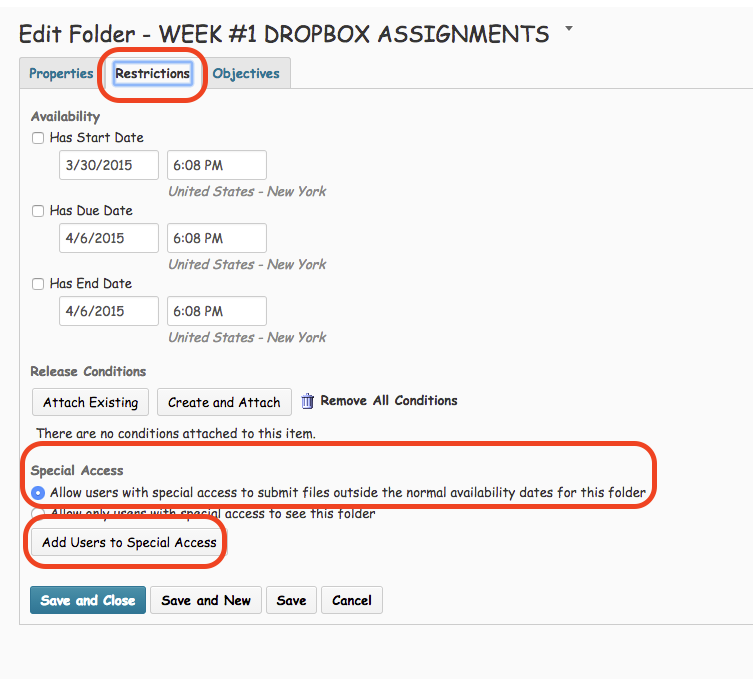
Modifying a dropbox is relatively easy in D2L. To modify the dropbox assignment you must go under the Assessment tab and click on "Dropbox" and choose the week you want to modify and click the arrow next to the name of the Dropbox. Enter folder properties > Click Restrictions > Click "Allow users with special access to submit files outside the normal availability dates for this folder" > Click on "Add Users to Special Access."
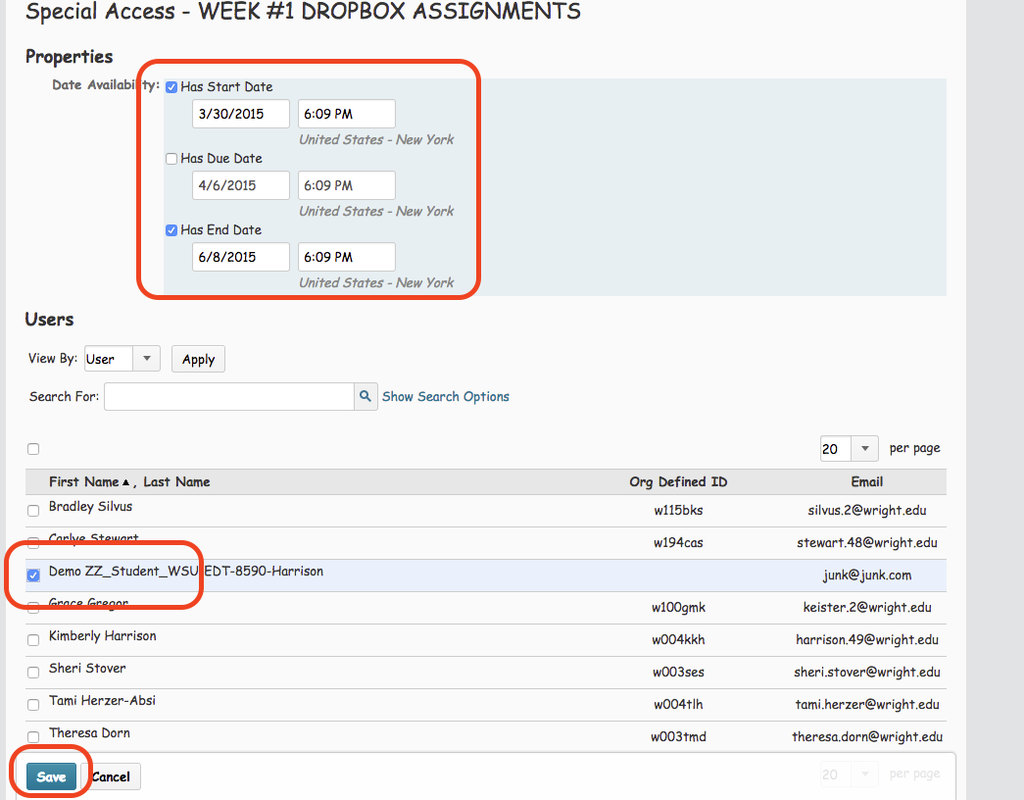
Set dates you want to give the student(s) for their assignment. > Click on the box to the left of the student(s) you want to give the differential access properties. > Click Save.
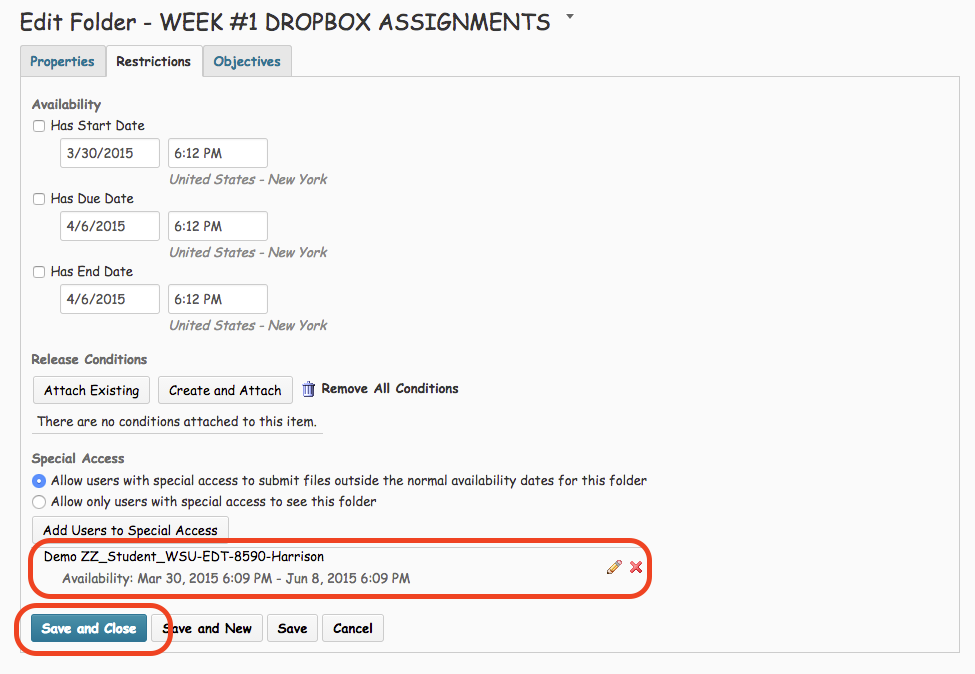
Make sure you see the student(s) you selected are displayed on the Restrictions tab and repeat the process for any additional dates and/or students. Click Save and Close.
Canvas- Modifying a Dropbox with Differentiated Conditions
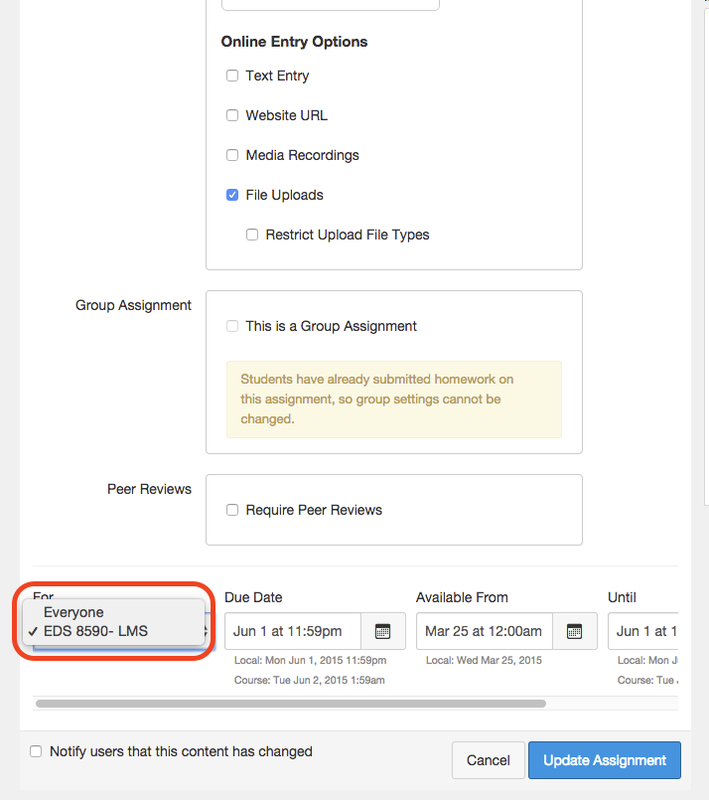
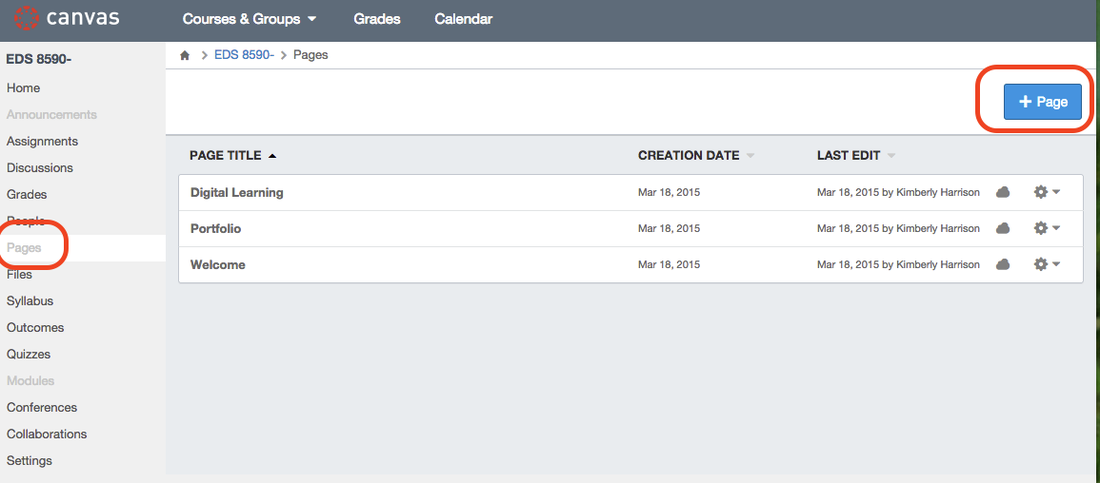
I was unable to figure out how to modify due dates for specific students in Canvas. I tried to find a "how to" in the tutorials but was also unable to locate any help with this tool. I was able to locate the due dates in the calendar but when I tried to edit the settings it would affect everyone or ALL students in the class.
I was unable to figure out how to modify due dates for specific students in Canvas. I tried to find a "how to" in the tutorials but was also unable to locate any help with this tool. I was able to locate the due dates in the calendar but when I tried to edit the settings it would affect everyone or ALL students in the class.
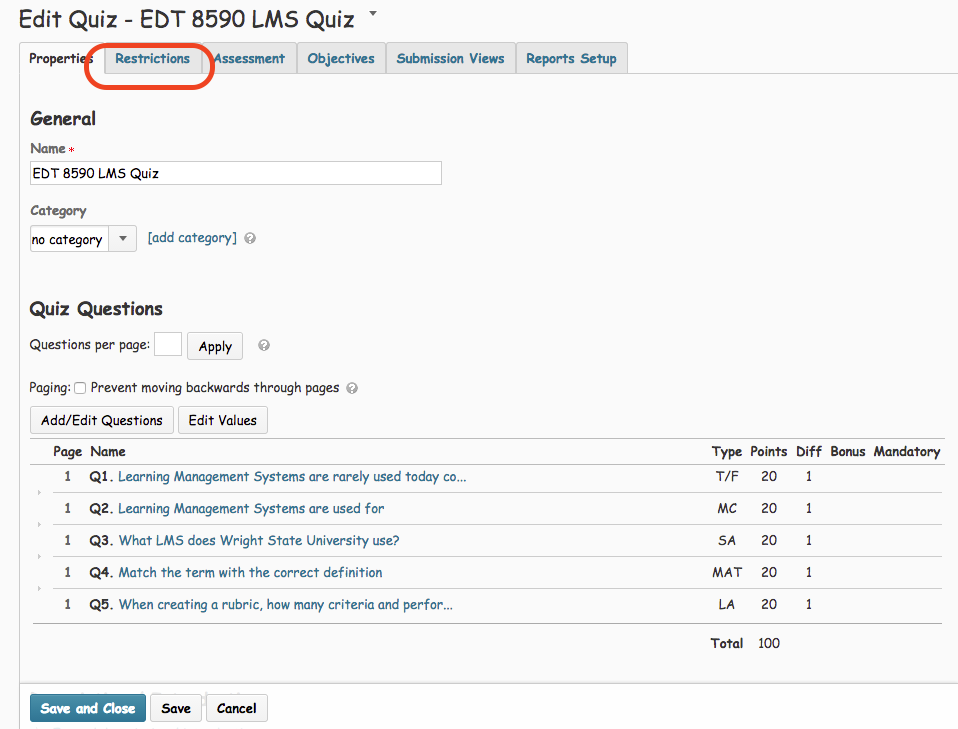
Desire 2 Learn- Modifying a Quiz with Differentiated Conditions
Modifying a quiz is also relatively easy in D2L. To modify a quiz you must go under the Assessment tab and click on "Quizzes and Exams" and choose the quiz you want to modify. Click on the blue hyperlink and click on the "Restrictions" tab.
Modifying a quiz is also relatively easy in D2L. To modify a quiz you must go under the Assessment tab and click on "Quizzes and Exams" and choose the quiz you want to modify. Click on the blue hyperlink and click on the "Restrictions" tab.
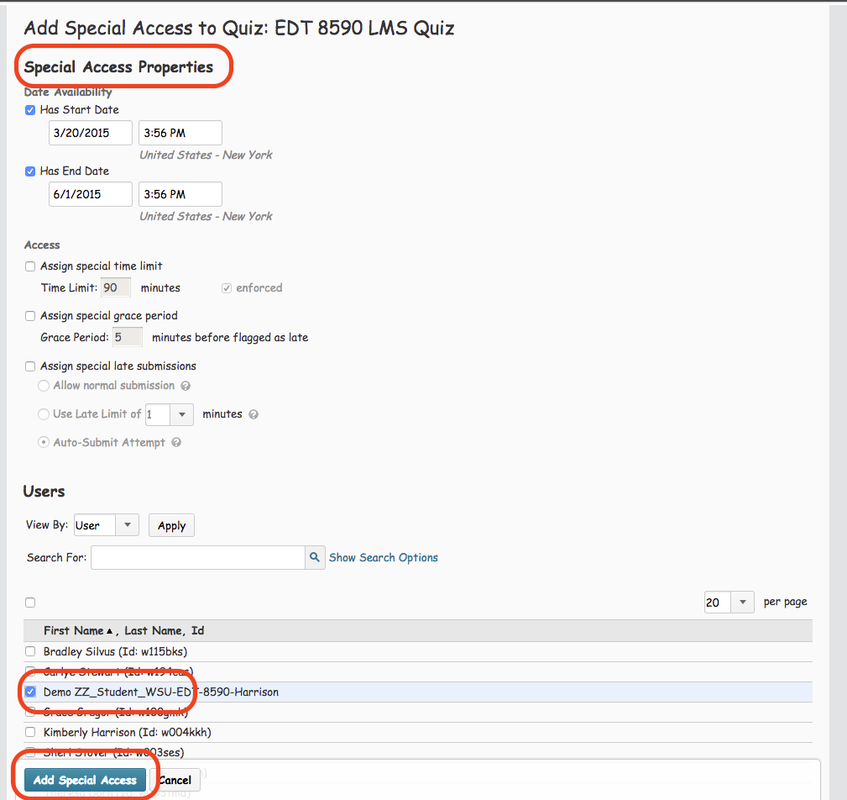
Make note of the dates and times you have set for the entire class. Under the "Advanced Availability" area click "Allow selected users special access to this quiz." > Click on "Add Users to Special Access" to add students who need differentiated access rights to the quiz. Under the "Special Access" properties, set the dates you want to give the student(s) for the quiz. Adjust time, due dates, etc. as needed. Once you click "Add Special Access" make sure the student(s) you chose are listed and click "Save and Close."
Canvas- Modifying a Quiz with Differentiated Conditions
Again, I was unable to figure out how to modify due dates or times for specific students in Canvas. When it comes to giving special access in various tools, I find that Canvas is NOT user friendly. I was unable to find a "how to" in the tutorials but I was able to locate the due dates in the calendar which would affect ALL students if anything was changed.
Again, I was unable to figure out how to modify due dates or times for specific students in Canvas. When it comes to giving special access in various tools, I find that Canvas is NOT user friendly. I was unable to find a "how to" in the tutorials but I was able to locate the due dates in the calendar which would affect ALL students if anything was changed.
Desire 2 Learn- Uploading a YouTube video with Closed Captioning
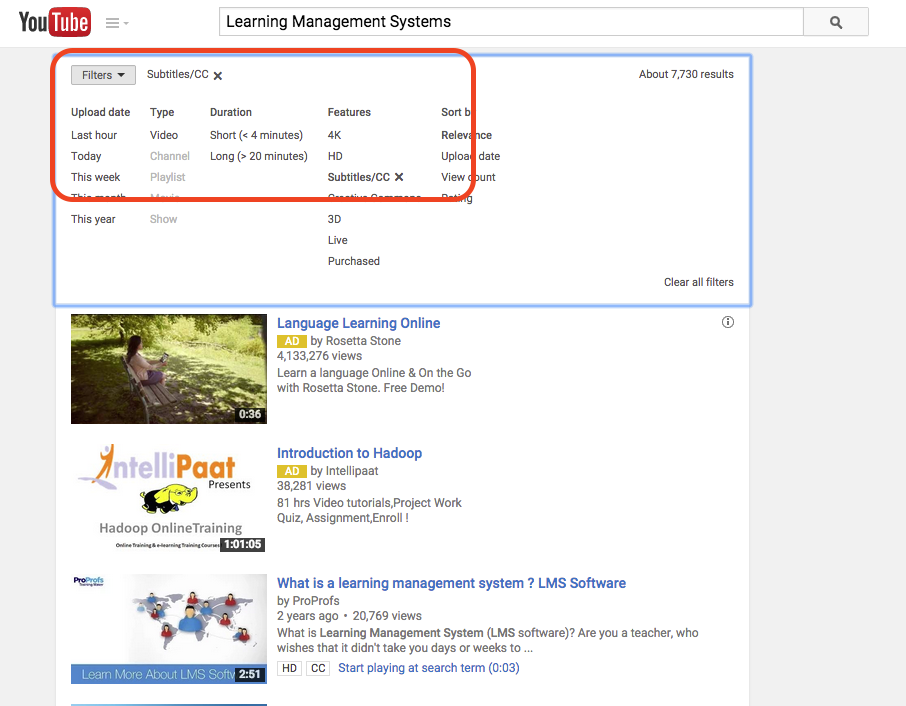
D2L makes uploading videos relatively painless. To upload a video from YouTube with CC, you must make those adjustments in YouTube itself. Enter what you are looking for in the search bar > Click on "Filters" > Select "Subtitles/CC."
D2L makes uploading videos relatively painless. To upload a video from YouTube with CC, you must make those adjustments in YouTube itself. Enter what you are looking for in the search bar > Click on "Filters" > Select "Subtitles/CC."
Once you decide on a video with CC, you should see the subtitles come up on the screen. Click on Share > Embed > and copy the link.
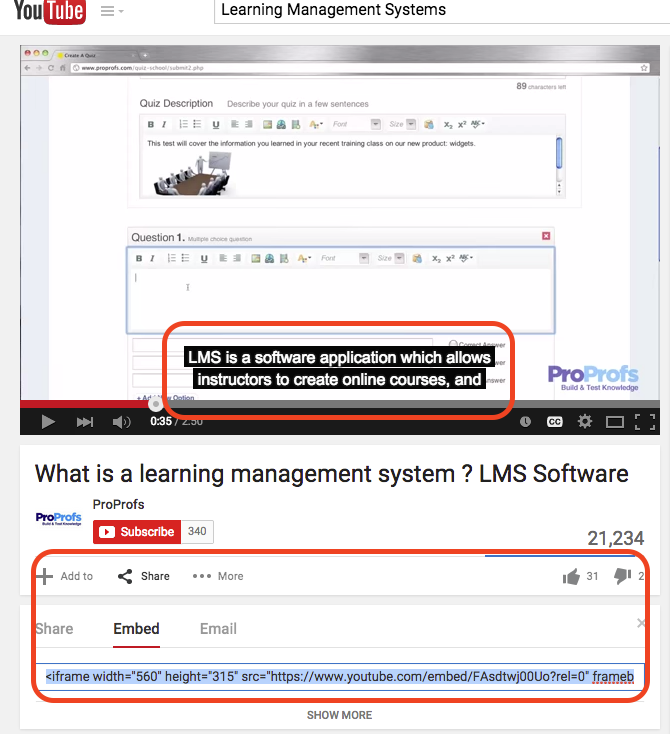
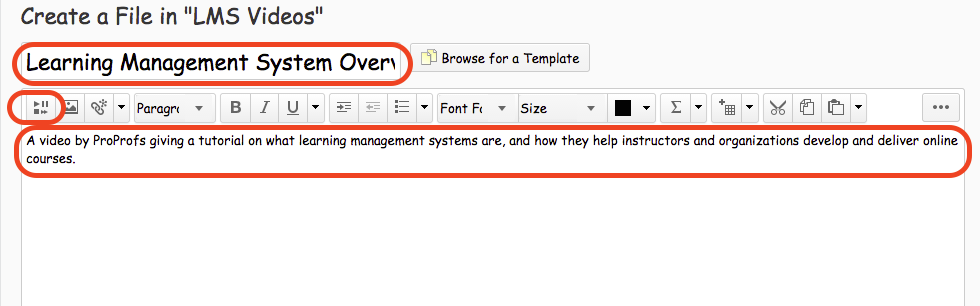
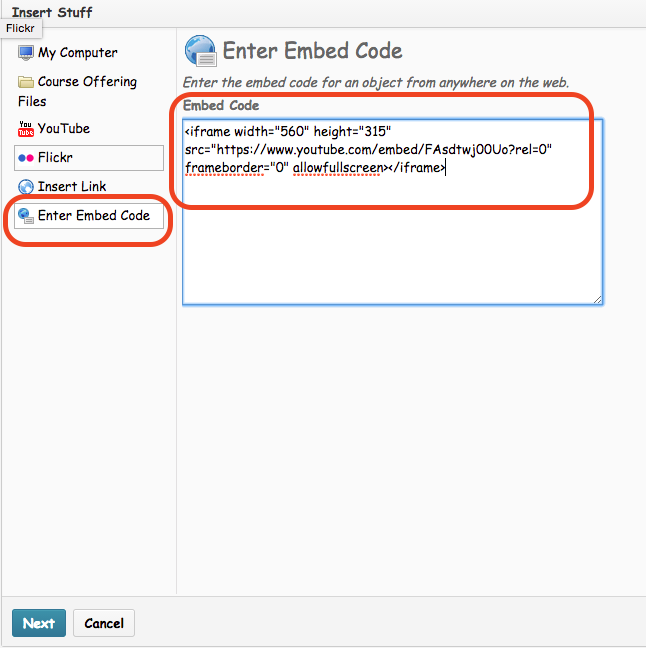
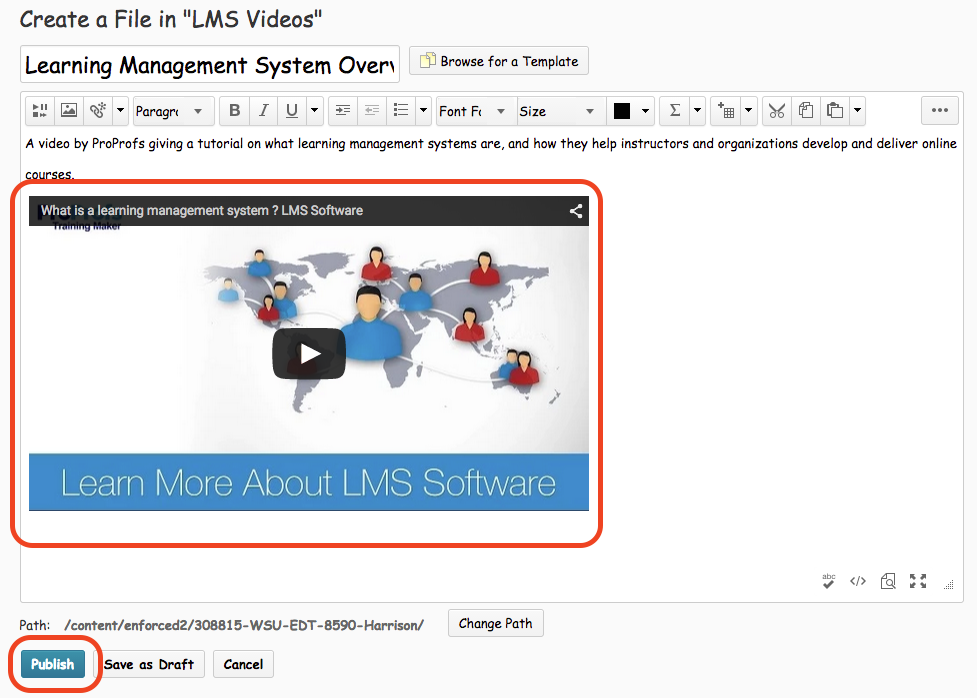
Next, you need to create a new module folder to store videos. To do this in D2L, you need to click on Content > Add Module > and name the module. Click on the newly created module and add a new page. Click on New > Create a File > Give file a name > Write an introduction and description of the video in the HTML editor and hit enter. > Click on the Insert Stuff button Click on Enter Embed Code and paste the code in the "Embed Code" box. In order to ensure that the URL is secure, make sure it says "https://www" and if there is no "s" after http, be sure to add it. > Click Next > Click Insert > Click Publish and do a quality check to make sure everything works correctly.
Click on Enter Embed Code and paste the code in the "Embed Code" box. In order to ensure that the URL is secure, make sure it says "https://www" and if there is no "s" after http, be sure to add it. > Click Next.
Click Insert > Click Publish and do a quality check to make sure everything works correctly.
Canvas- Uploading a YouTube video with Closed Captioning
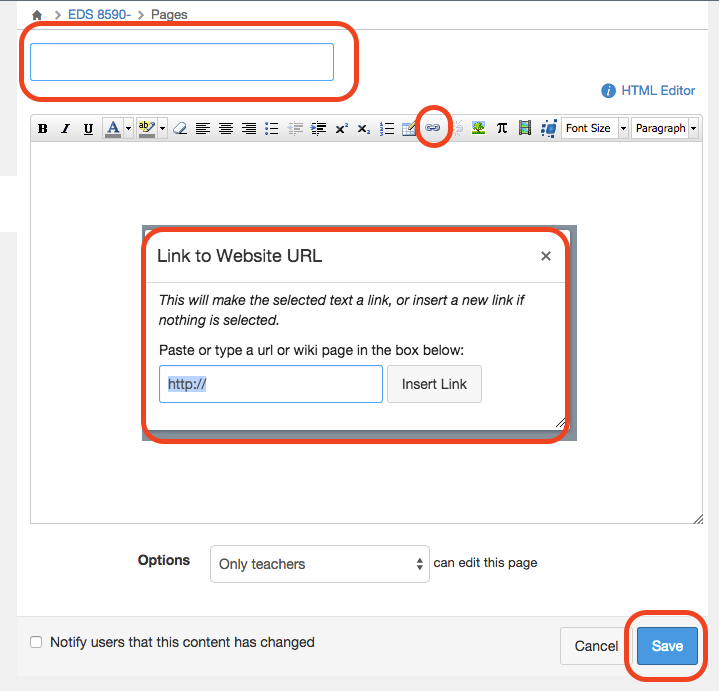
Uploading a video from YouTube with CC to Canvas follows the same steps as D2L. However, you need to first create a new page in Canvas.
Uploading a video from YouTube with CC to Canvas follows the same steps as D2L. However, you need to first create a new page in Canvas.
Next, you need to give your page a title > click on the link button > it will pop up with a box where you paste the embed code> click Save and the video should appear on the page.
Desire 2 Learn- Adding Third Party Tools
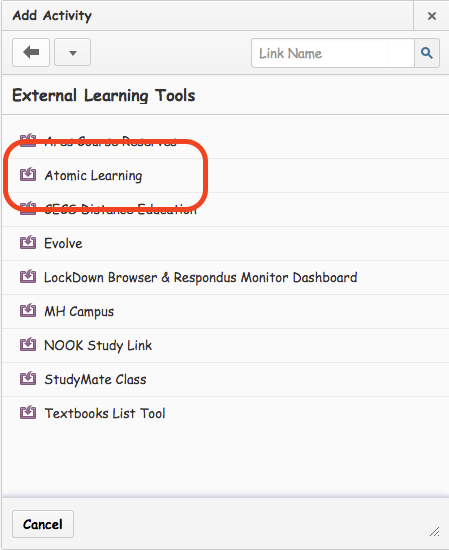
Again, D2L makes adding tools like the third party tool, Atomic Learning, a snap. To add this tool you need to click on Content > Select the week you want > Click on "Add Existing Activities" > Click on External Learning Tools.
Again, D2L makes adding tools like the third party tool, Atomic Learning, a snap. To add this tool you need to click on Content > Select the week you want > Click on "Add Existing Activities" > Click on External Learning Tools.
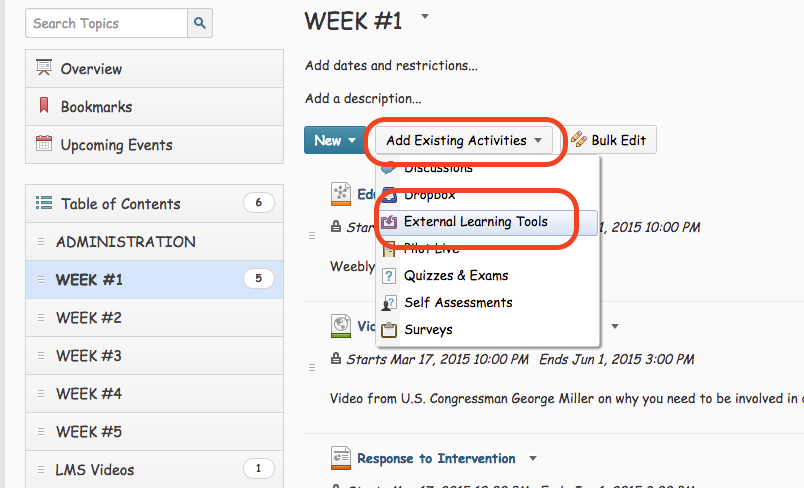
A list will pop up and you can choose the activity you wish to add. Once you choose, the activity will be displayed on the content page for that week.
Canvas- Adding Third Party Tools
Canvas offers a third party tool of it's own called Equella. Equella offers a shared content repository that various organizations can use. The ORE repository is a collection of free resources provided by this site. First, you have to create a page > Name the page > Click on the Equella button > Click Save.
Canvas offers a third party tool of it's own called Equella. Equella offers a shared content repository that various organizations can use. The ORE repository is a collection of free resources provided by this site. First, you have to create a page > Name the page > Click on the Equella button > Click Save.
Desire 2 Learn- Accessible HTML Templates with Cascading Style Sheets (CSS)
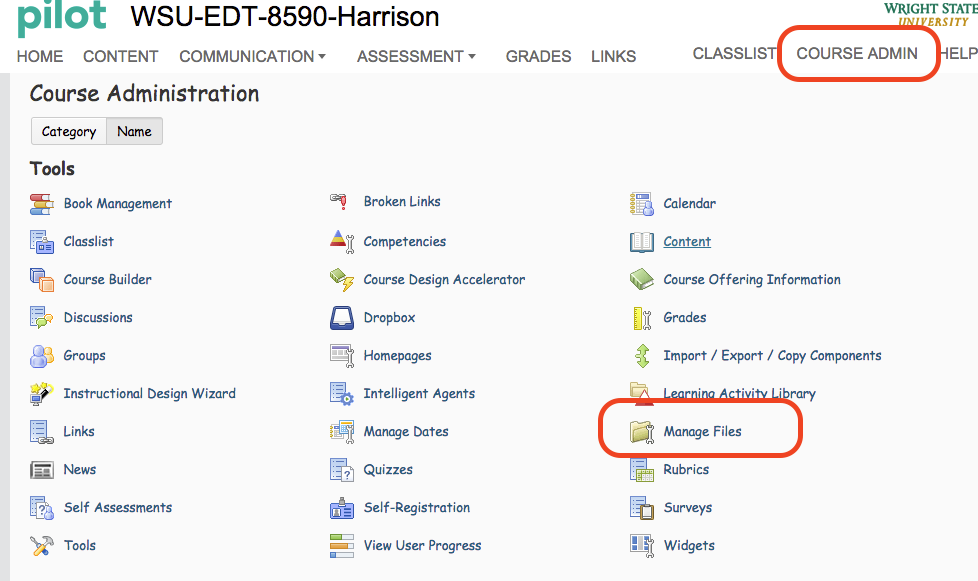
Consistency throughout your website is essential and using Cascading Style Sheets helps to reduce the complexity, repetition, and allows speaking browsers to scan a document by reading Heading 1 titles which allows visually impaired students scan to find articles they wish to read. The benefit of using CSS is that you don't need to know how to write code to make changes. I found D2L most user friendly when it came to using CSS. The first step is to locate HTML accessible template packages that you can download to your computer as a ".zip" file. I used a template from the following website (http://www.marquette.edu/its/help/d2l/103instructorhelp/en/accessible-html-templates.html). Next, you need to upload to D2L Manage Files.
Consistency throughout your website is essential and using Cascading Style Sheets helps to reduce the complexity, repetition, and allows speaking browsers to scan a document by reading Heading 1 titles which allows visually impaired students scan to find articles they wish to read. The benefit of using CSS is that you don't need to know how to write code to make changes. I found D2L most user friendly when it came to using CSS. The first step is to locate HTML accessible template packages that you can download to your computer as a ".zip" file. I used a template from the following website (http://www.marquette.edu/its/help/d2l/103instructorhelp/en/accessible-html-templates.html). Next, you need to upload to D2L Manage Files.
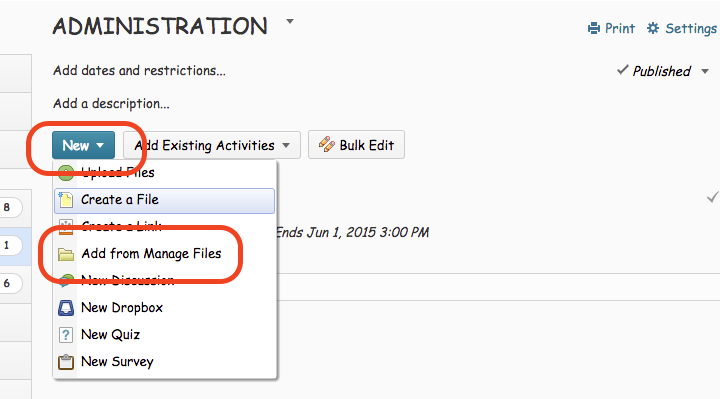
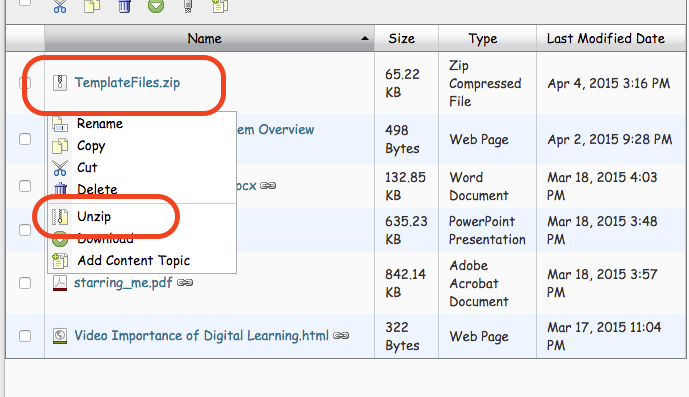
To upload the ".zip" file click New > Add from Manage Files > select Upload and Upload again > Save. Once you select the file, you need to unzip it. While in the Manage Files section, click to the right of the template package and click Unzip > and click the file name to view the files in the folder.
|
|
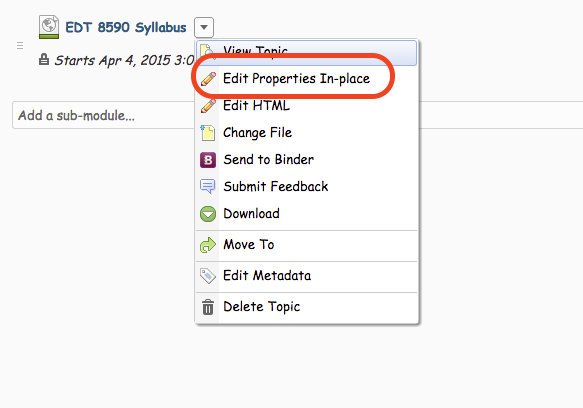
Be sure to create copies of the HTML files you are wanting to use as templates in the Content tool. These files need to be in the same root folder as the "Template Files" in order to make the CSS work properly. Now you need to add the accessible HTML files to your course content area so the students can view them. Click "Content" on the top Navbar > course Admin module > New > Add from Manage Files > click box on left of HTML file you want to use > Add. Be sure to create copies of the HTML files you are wanting to use as templates in the Content tool. These files need to be in the same root folder as the "Template Files" in order to make the CSS work properly. Next, you need to add the accessible HTML files to your course content area so the students can view them. You can also edit the name of the file by clicking on the arrow next to the name and selecting "Edit Properties In-Place" and you edit date restrictions.
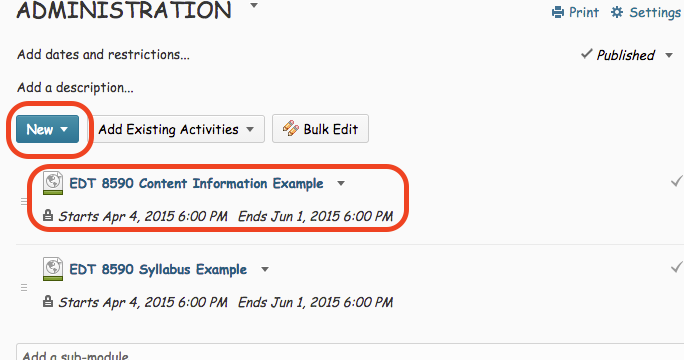
You can also edit the name of the file by clicking on the arrow next to the name and selecting "Edit Properties In-Place" and you edit date restrictions.
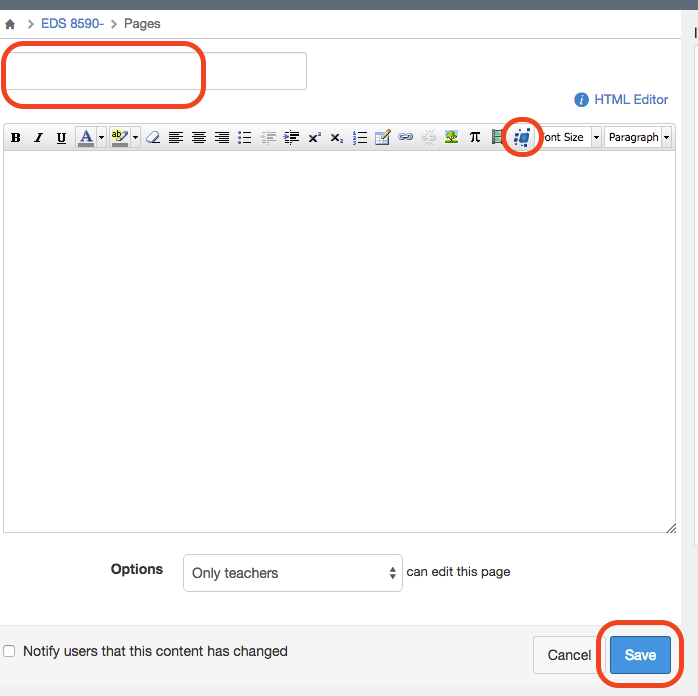
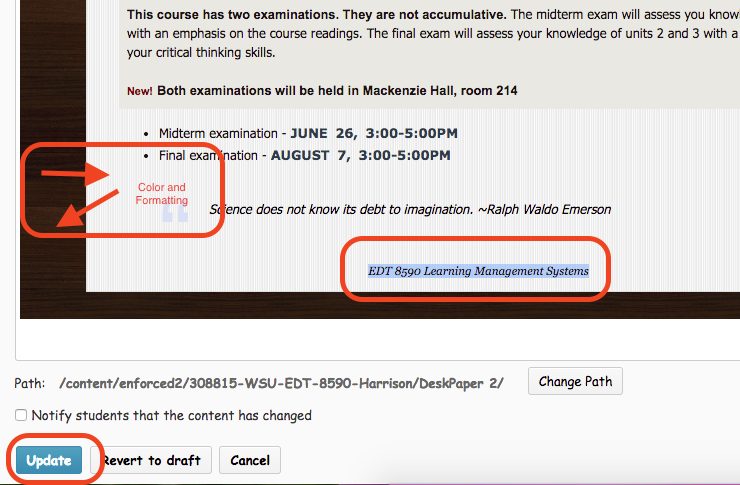
Finally, you need to revise the content in each file and customize it to your course. D2L has a free HTML editor built in to the system. While in the Content tool, click on the file to launch it and you should see the color and formatting of the template you chose. Scroll to the bottom of the page and click "Edit HTML" > change your content > Update.
Canvas- Accessible HTML Templates with Cascading Style Sheets (CSS)
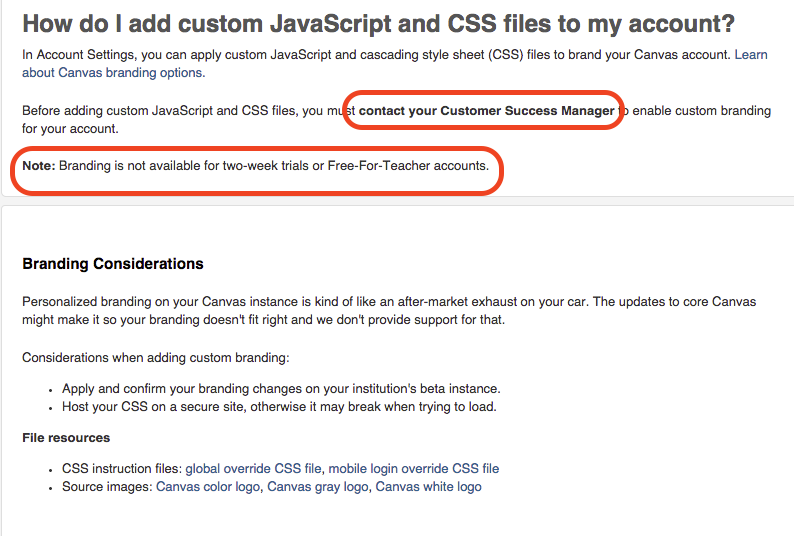
Canvas allows you to add custom CSS files to your course by way of "branding" your Canvas account. Unfortunately, the Free-For-Teacher account that I have is not available for branding. The Canvas Help Center gives a pretty good tutorial on how to add custom branding or CSS files to your account. It does state that you MUST contact your Customer Success Manager to enable this option.
Canvas allows you to add custom CSS files to your course by way of "branding" your Canvas account. Unfortunately, the Free-For-Teacher account that I have is not available for branding. The Canvas Help Center gives a pretty good tutorial on how to add custom branding or CSS files to your account. It does state that you MUST contact your Customer Success Manager to enable this option.
Recommendation
This week involved using tools that are designed to make both Desire 2 Learn and Canvas accessible to students with disabilities such as visual impairment. Many of these modifications are pretty specific and I found that D2L blew Canvas out of the water when it came to ease of use and availability of the tools themselves. D2L offers tutorials and specific and detailed navigation tabs, which makes this system very user friendly. The only modifications in Canvas that I was able to make was to the dropbox, quiz, and YouTube video. Canvas does offer a third party tool called Equella that gives access to a database of sorts similar to a library but the tool wouldn't load. Even with extensive searching in the Help Center I was unable to find how to add Cascading Style Sheets (CSS) in Canvas. There is a disclaimer that says custom branding, such as CSS, is not available for Free-For-Teacher accounts. It does offer a tutorial for those with the branding option but you must contact Canvas to have it enabled. Overall, I recommend using D2L when it comes making your course accessible.
